A Vintage Stitchwork adventure....
The most frequently asked question i am asked is ‘what can i make with the packs?’ The easy answer is anything!
The packs are designed and created to be a fabulous addition to any crafters stash - to dip into for any project. But they also can be used as a base for many individual projects, to inspire a wide range of crafts.
Here is a little guide to make Belle, using our most popular pack - the Stitchwork Inspiration pack.

Using one of the largest pieces of fabric in the pack i cut out the pattern pieces and stitched together to form the base of the doll.


Now the fun begins - the creating of a range of pretty garments from the laces and fabrics in the pack.
Letting each piece help decide what it can be used for - a beautiful piece of cotton lace and a ribbon section makes a stunning apron.

A simple A-line dress from a rectangle of silk.

Trimmed with the vintage french lace in each pack.

Using the buttons as a pretty posy.


The choices and combinations are endless, using the Vintage Fabric pack you can make a colourful springtime doll…watch our next programme on Hochanda on the 3rd February for more inspiration and examples.


How to make a Vintage Wreath and more with Simply Vintage...
This month I have been working on a little challenge - My Craft Inspiration Pack Challenge! To see how many craft projects I can make from just one of the Simply Vintage Mixed Craft Inspiration packs.

From the kit I used:
- 1 sheet of music
- 1 piece of floral fabric
- 3 sheets of pages
- Buttons
- Lace pieces
- Ribbon
- Snap fasteners
- Postcard
Just 10 elements…..from the 30 included! (and there are still parts of these left over!)
A Mixed Media Tin
Turning a vintage tin into a personal treasure!

Using the mixed craft inspiration pack, I start with a quick read of the lovely papers and pages included.

For this tin the first words I saw was "said the tailor" so this set the scene for a lovely tailors story.
The first backing paper I used was a 1950's weather chart which was torn into the lid and secured using a PVA glue mix with water (I use a 2:1 glue to water ratio).

Then comes the fun bit... taking some of the fabric piece and snipping around the flower design, picking out the buttons from the kits to use and adding a few bits of sewing paraphernalia to complete the story.
Once the items had been arranged to please the eye and heart, a thin layer of the PVA was added to seal the tin... a beautiful little memento from a tiny tin!

Mixed Media Wreath
A lovely Autumnal or Festive gift!
The wreath is created with various techniques beginning with layers of decoupage using the vintage pages included in the pack.

Cotton was then wrapped around the ring in sections…

…and the cut out flowers added. Each of these are fixed with the same PVA mix as before, making sure all of the white ring is covered.

A gold paint and PVA mix was used to create texture and depth, and some small feature items added from the pack.

A little paper rose was made using the spiral technique (see previous show) and sealed with a PVA layer.
Finally a large lace flower was stitched (see previous show for technique) and pinned on along with a lace bow and hanging ribbon.

Don't miss Melissa's amazing Simply Vintage show on Wednesday 17th August at 10am as she shows you just how to get the most from your Craft Inspiration Pack!
You can watch Hochanda live online, Sky channel 663, Freeview 39 (6am - 9pm) or Freesat 817.
DIY Vintage China Cake Stand Instructions - Simply Vintage Designs
Melissa of Simply Vintage Designs is back with the perfect step-by-step to create a vintage china cake stand with one of her craft kits, which can be bought from the Hochanda website here! Try it out and let us know how you get on!
Pack Includes:
- Cake Stand Handle
- Washers
- Standard Drill Bit
Equipment Needed:
- Electric Hand Drill
- Small Jug of Water
- Masking, Washi or Sticky tape
- Ruler or Tape Measure
- Pencil
- Old Tea Towel or Cloth
Step 1:

Choose some beautiful plates from which to create your cake stand. Make sure they are clean and without hairline cracks or chips.
Add a small strip of tape to the top and bottom of each plate, approximately in the centre.

On the plate’s top side, measure the precise centre by taking a ruler and placing it across the plate’s diameter and making a small dot with a pencil onto the masking tape.

Step 2:
Have a small vessel of water close by, a protective surface to work on and use an old tea towel (or any unwanted piece of fabric) under the plate to steady it as you drill.
Attach the diamond tip bit into your drill as per the tool’s manufacturer’s instructions.
To begin the initial hole, line the drill bit up to the dot in the centre of the plate and then tilt the drill to approximately 45 degrees.
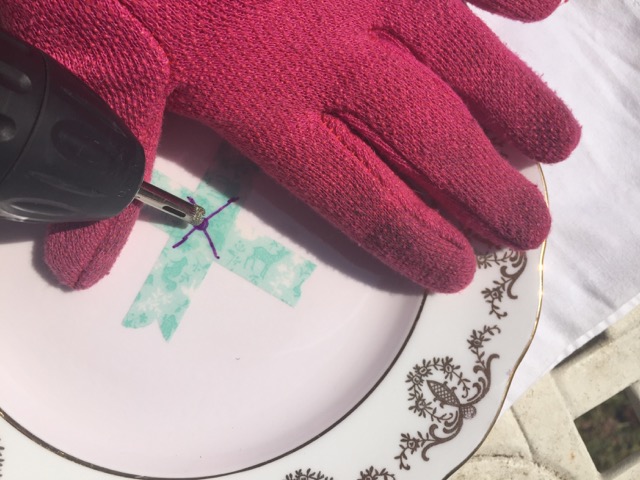
Holding the plate firmly at the edges, start the drill slowly. When feel the drill ‘bite’ through the plate’s glaze, remove the drill and add a splash of water to the centre of the plate to keep the drill bit cool.


Continue to drill holding the tool at a 90 degree angle to the plate pushing directly downwards with a small amount of pressure.
Slow and steady is the key to a clean, straight and chip free drill hole.
Once you feel the drill bit go through the bottom of the plate, carefully remove the bit from the newly drilled hole and repeat the process with your other plates.


Step 3:
To add the handle, starting with the bottom of the largest plate, place the screw up through the hole, add a washer, then the first stem of your handle.
Repeat until all your plates are in place. Make sure they are firmly tightened so that the plates do not wobble, but do not over tighten as this may damage the plates.
Step 4:
Put the kettle on, have a spot of afternoon tea with your new, fabulous and handmade cake stand!

DISCLAIMER:
Take care when using electrical equipment and drilling china, please use adequate safety equipment to avoid injury.
We cannot be held responsible for any injuries, loss or damage caused when using this product.
Your purchase signifies and confirms that you read and accepted the above policies.

Liked this step-by-step? Then tune in to Melissa with Simply Vintage Designs on Hochanda for more demos ! You can watch Hochanda live online, Sky channel 663, Freeview 39 (6am - 9pm) or Freesat 817.


No comments:
Post a Comment